PerKitna ~ My first Android app

After several hours of development, I’m proud to announce the release of my first Android app on the Google Play Store.

Presenting, PerKitna šŸ™‚

Screen Shot 2016-03-28 at 1.42.08 pm

As mentioned in my previous post, this relatively simple app was all the motivation I needed to stick through the various facets of Android application development that involved research, following tutorials, creating drafts & refining things throughout the course of development, testing and creation of assets. It wasn’t easy I’ll admit, the initial steps are always the hardest . For someone having no prior Android programming experience, it was fairly daunting coming to terms with using Android Studio as well as working with Java. However, the secret to finally coming up with the app was the desire to continually persist with it. Needless to say, I owe a big thank you to the online programming community for the resources that are contributed are more than worth their weight in gold.

Coming to PerKitna, it’s a very basic percentage && discount as well as a price/1000 calculator. Sure, there are calculators, discount calculators as well as scientific calculators that are available on Google Play Store but developing one that I could say was my own is a small but rather significant achievement. Also, I find the stock android calculator quite flimsy to use for percentages. The price/1000 feature was particularly important as it gave me the impetus to develop the app. When shopping at the vegetable market with my wife, often we’ve had vendors quote prices in odd amounts; amounts that weren’t whole. For example, potatoes were sold at INR 16 per 1.25 kgs (or 1250 weight units). Figuring out the price per kilo (1000 weight units) left me standing and staring into the distance on more occasions than one as I would try to visually compute the price per kilo (price/1000) in my mind. This was tedious to do while out on the road and that’s how the price/1000 feature came into being. It may seem a whimsical feature but it’s been quite productive. The discount mode as one will know is particularly handy when going shopping at the mall; to know how much the discount on an item is going to be and consequently, what amount you are required to pay to purchase it; straightforward. Since, it’s my first ever Android app, I’ve tried to keep it simple, user input is restricted to a certain number of digits because that’s what the app is supposed to be. Simple. Do try out the app & leave feedback, rating as well as critique. I hope to provide some useful upgrades for the app, the details of which are currently under wraps šŸ˜›

A big shoutout & vote of thanks to my wife & brother for pitching in as beta testers, providing valuable feedback as well as for being supportive and patient throughout the time. PerKitna wouldn’t have been possible without you two. So, thank you!

I know it probably warrants a post describing in detail the complete process; maybe later. If there’s anything specific you’d like to know about the entire programming to publishing experience, leave a comment & I will be glad to share my thoughts.

Resolutions!

Almost a quarter of the year is up &Ā therefore this postĀ about resolutions may seem jaded. Nonetheless, there are a few things that I’ve taken up this year after some planned & some unforeseen circumstances.

  1. Health:Ā THE MOST IMPORTANT one. Work required that I would start travelingĀ before the morning rooster crows & make it back home in a state that could only be described as a dead duck. Thankfully, a change in workplace now allows me to sleep more; thus having more ‘aware’ day time &Ā also allows me to consciously focus on my health in terms of involving more physical activity than I normally would while being employed at a desk job. Not to say that I would hate being an early riser but not at the cost of disrupting my mental capacity to focus on stuff through the day. Who doesn’t love a good nap?
  2. Learning:Ā The aforementioned change in workplace has me excited about new work in a way that I haven’t fully been in a few years. While I was learning a lot previously, now I am geared up to do something that is out of the normal in my work domain.
  3. Self-Update: Going forward from #2 above, I am also excited to take up Android development this year. It’s been a torrid love affair to begin with, for lack of time or lack of enthusiasm, but now I am keen on getting hands on with Android development a little by little on solely my ideas in order to keep the enthusiasm going. Enrolling for an Android developer course has been one of the steps that keeps me motivated. I’ve begun developing & I’m close to publishing a simple but hopefully friendly; android app very soon. And more if possible.

Fingers crossed to a year of fulfilment.

Tutorial: How to generate QR Code’s on iOS

Using the CoreImage framework, one can easily generate QR Codes from within an iOS app with very few lines of code. Using the CoreImage filter, specifically the ‘CIQRCodeGenerator‘ filter, you get a CIImage that is your QR code (a CIImage object). Sounds easy? It is.Ā Take a look at the code below:


– (void)viewDidLoad {
[super viewDidLoad];
// Do any additional setup after loading the view, typically from a nib.
NSString *info = @"https://codeafterhours.wordpress.com";
// Generation of QR code image
NSData *qrCodeData = [info dataUsingEncoding:NSISOLatin1StringEncoding]; // recommended encoding
CIFilter *qrCodeFilter = [CIFilter filterWithName:@"CIQRCodeGenerator"];
[qrCodeFilter setValue:qrCodeData forKey:@"inputMessage"];
[qrCodeFilter setValue:@"M" forKey:@"inputCorrectionLevel"]; //default of L,M,Q & H modes
CIImage *qrCodeImage = qrCodeFilter.outputImage;
CGRect imageSize = CGRectIntegral(qrCodeImage.extent); // generated image size
CGSize outputSize = CGSizeMake(240.0, 240.0); // required image size
CIImage *imageByTransform = [qrCodeImage imageByApplyingTransform:CGAffineTransformMakeScale(outputSize.width/CGRectGetWidth(imageSize), outputSize.height/CGRectGetHeight(imageSize))];
UIImage *qrCodeImageByTransform = [UIImage imageWithCIImage:imageByTransform];
self.imgViewQRCode.image = qrCodeImageByTransform;
// Generation of bar code image
CIFilter *barCodeFilter = [CIFilter filterWithName:@"CICode128BarcodeGenerator"];
NSData *barCodeData = [info dataUsingEncoding:NSASCIIStringEncoding]; // recommended encoding
[barCodeFilter setValue:barCodeData forKey:@"inputMessage"];
[barCodeFilter setValue:[NSNumber numberWithFloat:7.0] forKey:@"inputQuietSpace"]; //default whitespace on sides of barcode
CIImage *barCodeImage = barCodeFilter.outputImage;
self.imgViewBarCode.image = [UIImage imageWithCIImage:barCodeImage];
}

Start off by declaring the information that will be encapsulated in the QR code. Here, it is the url of this blog initialised as an NSString. Next, you convert this information into bytesĀ using the NSData object (always!), pay attention to the encoding used here;Ā NSISOLatin1StringEncoding which is the recommended encoding. The next bit is the heavy lifting made easy, create a CIFilter with nameĀ CIQRCodeGenerator as mentioned earlier &Ā set it’s inputMessage to theĀ NSData object. Setting the inputCorrectionLevel is optional, the default is ‘M’ out of possible L, M, Q & H modes. Finally, get the QR code image as a CIImage object from the CIFilter created previously.

The next few steps demonstrate scaling the CIImage such that optimum image quality is maintained given the dimensions of the containing image view you’d want to display the QR code image in; in this case an image view of size 240.0 x 240.0. This is required in order to prevent any possible loss of information as a result of scaling the image when displaying in say, a larger image view which may cause the scanning of this code to be inaccurate or worse still.. impossible. Thats it!

QR Code

Note that it is just as easy to generate a bar code using the ‘CICode128BarcodeGenerator‘ filter as shown at the end of the code sample.

Requesting Camera Permissions for iOS 9.0

On iOS 9.0+ devices, for no reason whatsoever, the device camera stopped displaying inside an app that uses the awesome ZBar SDK for QR Code scanning. Instead, what displays is a BSOD (Black Screen Of Doom…Ā :P).

IMG_1927

This needed investigating.
A quick search on StackOverflow will lead you to the most accepted answer(s) on the lines of having a CFBundleName / Bundle Display Name set in your app’s Info.plist file. For most user’s this works, why? no one can say for sure. However this didn’t work for me. A closer look however at the Privacy settings for the device Camera under the device’s Settings for the app revealed that the access was turned OFF. This is what I can only assume is an app default setting. I turned the toggle ON and accessed the app section requiring camera display & voila! It worked.
The most important thing to note however is that there is no system prompt at runtime, that notifies user’s about this crucial bit of information. The only safeguard now is to determine the device camera access information & notify the user about it at the very least.
Here’s how you do it; before you access the camera, you request access to it. Should you be granted access, you’re good to go; else, you must save face gracefully.


#import <AVFoundation/AVFoundation.h>
– (void)requestCameraPermissionsIfNeeded {
// check camera authorization status
AVAuthorizationStatus authStatus = [AVCaptureDevice authorizationStatusForMediaType:AVMediaTypeVideo];
switch (authStatus) {
case AVAuthorizationStatusAuthorized: { // camera authorized
// do camera intensive stuff
}
break;
case AVAuthorizationStatusNotDetermined: { // request authorization
[AVCaptureDevice requestAccessForMediaType:AVMediaTypeVideo completionHandler:^(BOOL granted) {
dispatch_async(dispatch_get_main_queue(), ^{
if(granted) {
// do camera intensive stuff
} else {
[self notifyUserOfCameraAccessDenial];
}
});
}];
}
break;
case AVAuthorizationStatusRestricted:
case AVAuthorizationStatusDenied: {
dispatch_async(dispatch_get_main_queue(), ^{
[self notifyUserOfCameraAccessDenial];
});
}
break;
default:
break;
}
}
– (void)notifyUserOfCameraAccessDenial {
// display a useful message asking the user to grant permissions from within Settings > Privacy > Camera
}

Note that you need to include the AVFoundation framework in your project &Ā import the AVFoundation.h header file as well.
Yes, we Cam!

Missing iOS Distribution / Development signing identity

If until recently you were able toĀ export your ipa’s smoothlyĀ &Ā now you aren’t able to do so because you’ve come face to face with the error in the title of this blog, fret not. This issue has surfaced due to the expiration of the intermediate certificate authority i.e. the ‘Apple Worldwide Developer Relations Certification Authority’ certificate. Depending on where you’re located, it would’ve expired on 14/15th February 2016. Let’s deal with this now.

  1. Open up ‘Keychain Access’ from spotlight.
  2. In the left panel, select the ‘login’ keychain under Keychains.
  3. InĀ the left panel, select ‘Certificates’ under Category.
  4. Now in the right panel, look for the aforementioned certificate. If it isn’t showing, from the ‘View’ menu, select ‘Show Expired Certificates’.
  5. Select the certificateĀ & hitĀ Delete.
  6. Repeat steps 4 & 5 but this time, by selecting the ‘System’ keychain under Keychains. This is also required &Ā a lot of peopleĀ forget to delete the certificate from the containingĀ keychains.
  7. Enter your system password if prompted by Keychain Access when deleting the certificate, this’ll happen if the keychain is locked.
  8. Download the new certificate by visitingĀ the certificate authority web pageĀ & locatingĀ theĀ WWDR Certificate (Expiring 02/07/23)Ā under Apple Intermediate Certificates; or just click here to download it.
  9. Double click to install the certificate in your keychain & you’re good to go!
  10. This will also make your other certificates that may have been showing up as invalid turn valid again.

Click here & here for more info.

Tip: If you’re not seeing or can’t find the expired certificate, you could also search a certificate by name by typing it in the search bar of keychain access. It’ll display the certificate in all the keychains that contain it. There! now you know how to do it the easy way, come time in 2023 šŸ™‚

Installing Android Studio on a Mac

Over the years, setting up the android environment on a Mac was always something I’ve felt as semi-daunting; often a deterrent of sorts with all the details that one needed to get right. Given the way in which settingĀ up iOS development on a Mac is a piece of cake, I’m finally happy that Google by means of the ‘Android Studio’ has made things a lotĀ easier iteration after iteration. Nonetheless, there are a few (minor) things that need to be done to be up & running with Android Studio. The order in which thisĀ post will describe the installation may not necessarily be considered standard but after a fairly considerable amount of time spent reading installation procedures & requirements, thisĀ is by far the easiest & quickest way I’ve been able to install Android Studio with.Ā There are a few essentials that are required at hand viz. the Android SDK Tools & the Android Studio IDE.Ā Lets get started.
Download both via links given below:
1. Android SDK Tools: http://dl.google.com/android/android-sdk_r24.3.4-macosx.zip
2. Android Studio IDE: https://dl.google.com/dl/android/studio/install/1.3.1.0/android-studio-ide-141.2135290-mac.dmg
As of the time of writing, the files are hosted at the links given above. Should you find that I’ve failed you, you can alwaysĀ visit https://developer.android.com/sdk/index.html#Other & download the SDK Tools from the section ‘SDK Tools Only’ & download the IDE from the section ‘All Android Studio packages’ ( right below the SDK Tools section or visit https://developer.android.com/sdk/index.html#mac-bundle)
Extract the SDK Tools & rename the folder to Android for convenience & move it to a good location on disk. I prefer to have it housedĀ under a Development directory on disk (Macintosh HD).
Next, we need to setup the Android SDK PATH. For this you will need to edit the .bash_profile file. No prizes for guessing here that this fileĀ is hidden on your system (under your Home directory). Launch Terminal &Ā type the following command to enable viewing hidden files:

defaults write com.apple.finder AppleShowAllFiles YES


You will need to relaunch Finder to view the file. Hold down the alt-option key, right click on Finder & select ‘Relaunch’.Ā Open up your Home directory and find the .bash_profile file now visible. If it isn’t there, don’t worry, it will beĀ created for you once we’re done with the next few steps.Ā Continuing in Terminal, type the following:

touch ~/.bash_profile

(Creates your .bash_profile file if it doesn’t exist)
 

open ~/.bash_profile

(Open the file for editing)


Now enter the following into the bash_profile file.

export PATH=$PATH:/Development/AndroidDevelopment/Android/tools
export PATH=$PATH:/Development/AndroidDevelopment/Android/platform-tools

Note that you will have to enter the paths as on your Mac so make the necessary changes.Ā Ensure that there are no blank spaces in the path as a result of intermediate folder names.Ā Save & close the file.

Enter the following commands next.

source ~/.bash_profile

(Makes changes immediately available)
 

defaults write com.apple.finder AppleShowAllFiles NO

(Hide the hidden files)
 

Now comes the easy part if you’ve felt anything that we’ve done so far to not be so.Ā Open the .dmg file for the Android Studio IDE and copy ‘Android Studio’ to Applications via drag & drop.Ā Now Run the Android Studio app to view the Android Studio Setup Wizard.

Android_Install_1
Click Next and choose Custom for ‘Install Type’.

Android_Install_2

Pick your choice of theme & hit Next.

Android_Install_3
Under the SDK Components Setup, take note of the Android SDK Location. It most likely
won’t be the location that you’ve placed your Android folder from the start of this tutorial.Ā Change it to that location. The wizard will now inform you of its finding of an existing Android SDK.

Android_Install_4
The upside now is that any additional downloads will only be for components that are required or notĀ already present. Click Next to view Emulator Settings. I’ve left them at Recommended, you may alter it to your need & click Next.

Android_Install_5
The Verify Settings screen will give you a gist of the required additional components that will be downloaded.

Android_Install_6
As written in the SDK Readme:

The Android SDK archive initially contains only the basic SDK tools. It does
not contain an Android platform or any third-party libraries. In fact, it
doesn’t even have all the tools you need to develop an application.

In order to start developing applications, you must install the Platform-tools
and at least one version of the Android platform, using the SDK Manager.

Click Next to begin with the download.

Android_Install_7

Depending on your bandwidth this could take from a few minutes to about an hour, maybe more (tough luck)Ā for the download to complete. Grab a coffee while you wait or any other beverage of your choice! As the downloads progress, fyi, the files will be stored under /Android/temp.Ā Click Finish when setup is complete to view the warm & welcoming Android Studio Quick Start screen.

Android_Install_8

And that’s it!Ā You’ve successfully managed to install Android Studio on a Mac. Good luck with Android Development.

Extras:
1. From the Quick Start screen, you could select Configure > SDK ManagerĀ or if you’ve been very excited & have already created a new project or have one open; select Tools > Android > SDK Manager to view installed components & download any more if you like. I strongly suggest you download the documentation for Android SDK as it’s extremely helpful.

Android_Install_9
2. If on launching Android Studio it complains about Java installed on your Mac not being the latest version, you can get that from here: https://support.apple.com/downloads/DL1572/en_US/javaforosx.dmg
or just go here https://support.apple.com/kb/DL1572?viewlocale=en_US&locale=en_US & download the required dmg.

Cheers!

Tutorial: Google Analytics for iOS Apps

An often unexplored facet of iOS or mobile app development in general is app analytics. While you can get analytics or summary of app downloads on iTunesConnect, I find that app analytics can help improve the app experience by a mile. Purely because it lets you determine what in your app engages users & what doesn’t. This gives you a plethora of insight which will lead to you creating a better app experience for end users. This post mainly deals with Google Analytics, my preferred analytics tool compared to others available.

First up you need to obtain a Tracking ID for your app. This ID is what your app analytics will coalesce under. Let’s get one for this tutorial.
Sign in to the Google Analytics page and create a new account. Select ‘Mobile app’, fill up the details (ignore the bit that talks about already tracking an app with GA) & scroll to the bottom to get your Tracking ID.

Screen Shot 2014-11-07 at 11.27.10 am

You will then be taken to your analytics admin page where you will find your Tracking ID of the form UA-XXXXXXXX-Y. That’s all it takes to setup your analytics on the ‘web’ side of things. Next up, lets get this all working within an app. From the admin page, download Google Analytics iOS SDK. Ignore the ‘Download with admob features’ button as that adds AdMob related stuff to the analytics download package which we won’t be dealing with.

Screen Shot 2014-11-07 at 11.28.16 am

While writing this post, the latest version of Google Analytics or GA in short is 3.10. Locate the downloaded GoogleAnalyticsServicesiOS_3.10.zip file on your computer and unzip the contents. The important bits from the contents of the folder GoogleAnalyticsServicesiOS_3.10 are the Google Analytics Library header files & the libGoogleAnalyticsServices.a library.

Screen Shot 2014-11-07 at 12.14.32 pm

Create or open a new project in Xcode & do the following:

  1. Add GA headers
    Project navigator > Right click > Add files to '[Your Project]' > Select the aforementioned GA Library folder containing the GA headers > Select the 'Copy items if needed' destination checkbox (if unchecked) > Click Add.
  2. Add the libGoogleAnalyticsServices.a library.
    Select your project in the Project navigator > Select Target > Build Phases > Link Binary With Libraries > + > Add Other... > Browse to the downloaded GA folder > Select libGoogleAnalyticsServices.a > Click Open.
  3. Add the required system frameworks for GA viz. CoreData.framework, SystemConfiguration.framework & libz.dylib. Follow similar steps to adding the GA lib file from the above except that you just add the frameworks from the system frameworks popup list.

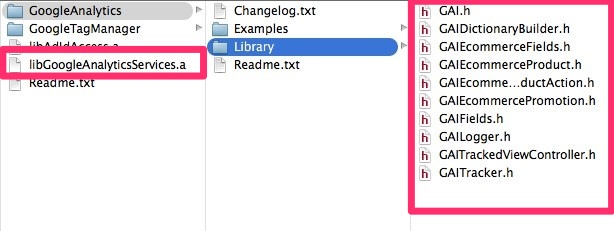
If you’ve followed correctly, your project structure should resemble the screenshot below.

Screen Shot 2014-11-07 at 12.40.32 pm

Time to add some code to get analytics up & running. Open your application delegate .m file & #import "GAI.h". Add the following lines inside your didFinishLaunchingWithOptions: method.

[[GAI sharedInstance] setDispatchInterval:10.0];
[[GAI sharedInstance] trackerWithTrackingId:@"Your GA ID here(UA-XXXXXXXX-Y)"];

This creates a tracker with your given tracking id & sets the dispatch interval at which analytics reporting will be performed. We’ve set it to 10 seconds. The created tracker will persist & can later on be obtained for other purposes which we shall see a little later in this post. The most basic usage of analytics is to track page or screen views & events to gauge user interaction. Lets see how to do the former.

GA provides a GAITrackedViewController class for automatic screen analytics. It’s as easy as subclassing your view controller & setting it’s screenName property which identifies the screen in the analytics reports. Setting the screenName is a must for tracking if you take the subclassing route. Open up your view controller .h file & #import "GAITrackedViewController.h" at the top. Change your view controller parent class from UIViewController to GAITrackedViewController. Open up the view controller .m file & in its viewWillAppear: method, add the following line

self.screenName = @"Main Screen";

Thats it! Each time your view controller view appears on screen, a screen view tracking hit or record will be created & sent to analytics with the screenName value. If you don’t want to subclass you can also do the same manually. In the view controller .m file #import "GAIDictionaryBuilder.h" & #import "GAIFields.h". Add the block of code below in viewWillAppear:

id<GAITracker> tracker = [[GAI sharedInstance] defaultTracker];
[tracker set:kGAIScreenName value:@"Detail Screen"];
[[GAI sharedInstance].defaultTracker send:[[GAIDictionaryBuilder createScreenView] build]];

The above piece of code gets the default tracker which is your tracker with your Tracking ID that was created in the application delegate, builds a dictionary of hit parameters & values for a screen view sent via the tracker instance. Note that it is important to set the kGAIScreenName or kGAIDescription else the screen name won’t be set for the tracker hit.
You can view the 2 screen view tracking implementations in the sample project’s View Controller & Detail Controller files. This is as simple as it gets for screen view analytics. If you’ve gotten this far, you will be glad to know that event tracking is as simple as the line of code below.

[[GAI sharedInstance].defaultTracker send:[[GAIDictionaryBuilder createEventWithCategory:@"Button Events" action:@"Button Click" label:@"Hello!" value:nil] build]];

That’s all it takes to record the click of a button titled ‘Hello!’.

Download or clone the sample project from the link at the end of this post to see everything in this tutorial in action. Switch between screens to initiate screen view tracking & hit the Hello! button to do some event tracking. View the ‘Reporting’ page which provides extensive detail about the analytics & also provides Real Time analytics viewing! Don’t worry if you aren’t able to see analytics reporting immediately, it does take a while for the Manhattan plot to come up šŸ˜‰

Screen Shot 2014-11-07 at 2.10.39 pm

Screen Shot 2014-11-07 at 2.10.47 pm

As a bonus, you can also have analytics for exceptions by setting trackUncaughtExceptions to YES & see GA debug information by setting the log level to kGAILogLevelVerbose from the available options on the trackers GAILogger (See sample project).

GA debug info sample:

2014-11-07 14:10:06.177 Heiosenberg[4965:105816] VERBOSE: GoogleAnalytics 3.10 -[GAIBatchingDispatcher persist:] (GAIBatchingDispatcher.m:497): Saved hit: {
parameters = {
"&amp;_crc" = 0;
"&amp;_u" = ".o";
"&amp;_v" = "mi3.1.0";
"&amp;a" = 1779447972;
"&amp;aid" = "com.heiosenberg.wordpress.Heiosenberg";
"&amp;an" = Heiosenberg;
"&amp;av" = "1.0";
"&amp;cd" = "Main Screen";
"&amp;cid" = "70eda709-b530-48f3-b6de-18c79a662507";
"&amp;ds" = app;
"&amp;sr" = 375x667;
"&amp;t" = appview;
"&amp;tid" = "UA-XXXXXXXX-Y";
"&amp;ul" = en;
"&amp;v" = 1;
"&amp;z" = 16805254527687481534;
gaiVersion = "3.10";
};
timestamp = "2014-11-07 08:40:06 +0000";
}
2014-11-07 14:10:06.511 Heiosenberg[4965:105816] VERBOSE: GoogleAnalytics 3.10 -[GAIRequestBuilder requestPostUrl:payload:compression:] (GAIRequestBuilder.m:167): building URLRequest for https://ssl.google-analytics.com/batch
2014-11-07 14:10:06.512 Heiosenberg[4965:105816] VERBOSE: GoogleAnalytics 3.10 -[GAIBatchingDispatcher dispatchWithCompletionHandler:] (GAIBatchingDispatcher.m:612): Sending hit(s) POST: https://ssl.google-analytics.com/batch
2014-11-07 14:10:06.573 Heiosenberg[4965:105762] INFO: GoogleAnalytics 3.10 -[GAIBatchingDispatcher didSendHits:response:data:error:] (GAIBatchingDispatcher.m:208): Hit(s) dispatched: HTTP status 200
2014-11-07 14:10:06.573 Heiosenberg[4965:105816] INFO: GoogleAnalytics 3.10 -[GAIBatchingDispatcher deleteHits:] (GAIBatchingDispatcher.m:509): hit(s) Successfully deleted
2014-11-07 14:10:06.574 Heiosenberg[4965:105816] INFO: GoogleAnalytics 3.10 -[GAIBatchingDispatcher didSendHits:] (GAIBatchingDispatcher.m:219): 2 hit(s) sent

Make sure to use your own Tracking ID in the application delegate to setup tracking & set a suitable dispatch interval. Setting this to 0 or 1~2 I think is bad practice since all the hits are saved & sent which means you don’t need to aggressively send tracking hits. Although this post covers just the basics of GA it is up to you to explore & use the information to your advantage. Find something interesting? Add a comment & let me know!

[Download Source]

NSBundle pathForResource: with bundled images idiosyncrasy

Looking up the quick help for pathForResource: yields the following description:

Returns the full pathname for the resource identified by the specified name and file extension. The method first looks for a matching resource file in the non-localized resource directory of the specified bundle. If a matching resource file is not found, it then looks in the top level of an available language-specific .lproj folder. (The search order for the language-specific folders corresponds to the userā€™s preferences.) It does not recurse through other subfolders at any of these locations.

As I found out erroneously, now that the iPhone6+ with its 3x resolution makes use of @3x assets, that merely fetching the base file by:

NSString *imagePath = [[NSBundle mainBundle] pathForResource:@"loader" ofType:@"png"];

DOES NOT return the @2x or @3x image paths for previous retina devices and the new iPhone 6 & 6+ devices. A bit cumbersome that should the image loader.png not be found that the system would NOT look for a loader@2x.png image. So also if a loader@3x.png image was referenced by path, should it not be present, the system won’t return a loader@2x.png image path EVEN IF it’s present in the application bundle. Would have been great if it would work just like the UIImage imageNamed: method that picks the correct image based on device resolution, else downscales a higher resolution image appropriately for the device. I know the pathForResource: method is more on the file side of things but it could be a nice enhancement to optionally handle images differently. Or maybe I’m being too lazy to write a little extra code šŸ™‚
Either way, I ended up writing a small but additional block of code to append @2x or @3x string extensions to the resource name in conjunction with a helper class that does the device type detection. So much for now.

Undefined symbols for architecture i386: “_OBJC_CLASS_$_ViewController”

Undefined symbols for architecture i386:
"_OBJC_CLASS_$_ViewController", referenced from:
objc-class-ref in AppDelegate.o
ld: symbol(s) not found for architecture i386
clang: error: linker command failed with exit code 1 (use -v to see invocation)

A common cause of panic while programming in iOS is when your UIViewController class file or another class file goes missing from the compile process. As a result, Xcode throws errors your way for every place you’ve gone on to import the class interface file (.h file).

To fix this, select your project file and from there, navigate to your application Target. On selection of the target, you will see a host of optionsĀ categorised under tabs such as General, Capabilities, Info etc. Select the “Build Phases” tab and scroll down to the “Compile Sources” setting. Hit the plus button (+) at the bottom of this setting and in the resultant file browser window that opens, select and add the missing ViewController implementation (.m) file. Clean (Command + K) and Build (Command + B) and you should see the error disappear as the Xcode compiler will now compileĀ the file.
Screen_Shot_2014-10-02_at_7_35_43_pm

Core Location change in iOS 8.0

Remember the prompt that would show up requestingĀ access to the user’s current location?
iOS_Simulator_Screen_Shot_30-Sep-2014_3_39_12_pm

Since the release of iOS 8.0, you will no longer see the current locationĀ dialog if you are using a <CLLocationManagerDelegate> in your app and your Core LocationĀ code will not work like it used to at least until iOS 8.0 was released. Among the changes that have ushered in with the new OS, there is one you will have to do to get back onto the Core Location train.

Firstly, you will need toĀ callĀ requestAlwaysAuthorizationĀ for usage in background orĀ requestWhenInUseAuthorizationĀ for usage in foregroundĀ on your CLLocationManager instance.

Secondly, you need to add a NSLocationAlwaysUsageDescription (background) or NSLocationWhenInUseUsageDescription (foreground) key to your project’s Info.plist file. The value for this key is a string that will show up on the location access request prompt.

Screen Shot 2014-09-30 at 3.33.48 pm

And that’s it ! Note that until you add theĀ key-value pair to the Info.plist file, the prompt won’t display when expected. If you’ve done everything correctly, lo and behold:

iOS_Simulator_Screen_Shot_30-Sep-2014_3_34_52_pm

Since the requestAlwaysAuthorization and requestWhenInUseAuthorization methods are only availableĀ from iOS 8.0, you will need to take care to first check and then call them on your CLLocationManager instance, otherwise, bad things will happen on lower OS’s that don’t support the call. A good way as always to do so would be:

if([myLocationManager respondsToSelector:@selector(requestWhenInUseAuthorization)])
    [myLocationManager requestWhenInUseAuthorization];

Happy Coding !